
Quick Answer: A privacy screen is a weekend build, but treat it as engineering, not decoration: it acts like a sail, so wind load, sightline angles and solid mounting decide whether it stands up and actually shields you.
Your screen looked perfect all afternoon — solid, private, exactly the retreat you pictured. Then night fell, the patio lights came on, and from the neighbour’s side your silhouette showed up clear as a shadow puppet. Privacy is not an afternoon job; it is an after-dark one, and most screens fail the test nobody thinks to run.

Before you buy a single board, do the one test that costs nothing: stand where your neighbour stands and look back at your patio. What you can see from there — and what you cannot — decides the height, the gaps, and the design, and it takes about five minutes. This guide builds everything around that walk.
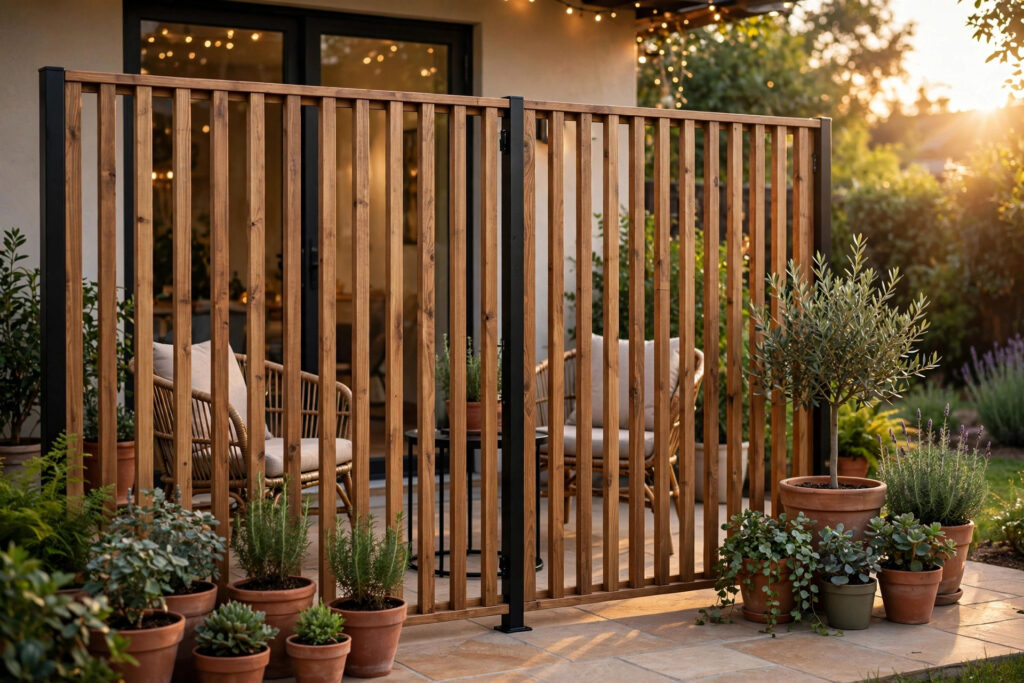
The principle: a privacy screen manages wind (it’s a sail — the engineering), sightlines (the actual privacy — angles matter, not just height), and aesthetics (it’s the most visible thing you build). Every decision serves one of these three.
Freestanding vs mounted
| Freestanding | Mounted (to house/fence) | |
|---|---|---|
| Stability | Needs engineered base (the wind) | House provides the anchor |
| Flexibility | Movable, repositionable | Fixed |
| Best for | Patios, renters (with weighted base) | Decks, permanent installations |
Freestanding needs the base engineering (weighted planters, concrete-filled posts — the anti-tip). Mounted is simpler structurally (the house is the anchor) but permanent.
The wind engineering (the critical)
A privacy screen is a sail. The solid the screen, the more wind it catches. This is the #1 structural consideration.
Managing wind load
| Strategy | How |
|---|---|
| Slatted (not solid) | Gaps let wind through (the pressure relief — 1–2″ gaps cut the load dramatically) |
| Angled slats (louvered) | Blocks sightlines, passes wind (the clever — the louver principle) |
| Sturdy posts | 4×4 minimum, deep-set (the resistance) |
| Low height | 6 ft max freestanding (the leverage — taller = exponentially more force) |
The louvered screen is the engineer’s answer — angled slats block the sightline (privacy) while passing air (wind relief). It’s more work, but it’s the best-performing design.
The sightline geometry
Privacy isn’t about height — it’s about angles. A 6-ft screen blocks the ground-level neighbor; the second-story window needs the angle considered (the sightline from above). Walk the neighbor’s perspective (literally — stand where they stand, look at your space; the empirical test).
Design options
| Design | Privacy | Wind | Look |
|---|---|---|---|
| Horizontal slats | Good (with tight spacing) | Moderate | Modern (the contemporary) |
| Vertical slats | Good | Moderate | Traditional |
| Louvered | Excellent | Low (the wind passes) | Crafted (the premium) |
| Lattice + plants | Growing (the living screen) | Low | Natural (the garden) |
| Solid panels | Total | HIGH (the sail — engineer accordingly) | Bold |
Horizontal slats are the modern standard (the clean lines, the straightforward build). Lattice + climbing plants is the living version (the trellis principle — the plants provide the evolving privacy).
Materials
- Cedar (the outdoor classic — beautiful, rot-resistant).
- Pressure-treated (the budget — the structural).
- Composite (the no-maintenance — the modern).
- Posts: 4×4 minimum (the wind demands it — don’t undersize).
The base (freestanding)
| Base | Stability | Best for |
|---|---|---|
| Concrete-filled planters | Excellent | The dual-purpose (plants + ballast) |
| Buried posts | Excellent | Permanent (the fence principle) |
| Weighted feet | Good | Semi-permanent (the movable) |
| Bolted to patio | Excellent | Concrete patios (the anchoring) |
Concrete-filled planters are the elegant solution — the weight is hidden, the plants soften the structure, and it’s movable (with effort). Fill with concrete in the bottom third, soil on top.
Tools needed
| Tool | For |
|---|---|
| Circular or miter saw | Cutting slats |
| Drill/driver | Assembly |
| Level | Plumb posts, level rails |
| Tape measure | Layout (the slat spacing — the precision) |
| Spacer blocks | Consistent gaps (the jig — the professional result) |
Construction
1. Plan
- Location (the sightline walk — the empirical).
- Height (6 ft standard — the proportion).
- Length (the coverage — the sightline geometry determines it).
2. Posts/base
- Freestanding: planters with concrete (the ballast) or buried posts.
- Mounted: lag-bolted to structure (the anchor).
- Plumb (the visual — leaning screens look wrong).
3. Frame
- Top and bottom rails (the structure — the slats attach here).
- Level rails (the slats follow — the precision).
4. Slats
- Cut to length (the batch — the consistency).
- Spacer jig (the uniform gaps — the professional look).
- Attach (screws — the technique — consistent, the screw line matters visually).
- The gap: 1–2″ (the wind relief + the partial see-through that reads as design, not flaw).
5. Finish
Exterior stain/paint (the wood finish — before or after assembly; before is easier, after is more thorough).
6. Plants (optional)
Climbing plants at the base (the living layer — the trellis plants work here; the screen becomes the garden).
The evening test: privacy after dark is different
Most privacy screens fail the evening test, not the afternoon one. In daylight, a slatted screen that looks almost solid can turn surprisingly transparent at night when your patio lights or indoor lights are on and the neighbour’s side is dark — light shining through the gaps outlines anyone sitting behind it in silhouette. Before you fix the final slat spacing, test it properly. After dark, have someone sit in your usual chair with the lights on as you would normally use them, then walk to the viewpoints you are screening from and look back. If silhouettes read clearly, tighten the gaps on that section, switch that section to an angled or louvered arrangement, or plan a planting layer in front of it. Five minutes of testing beats rebuilding a finished screen.
Do the same test in wind, if you can. On a breezy day, sit behind a test panel or even a sheet of cardboard held in place and feel how much shelter you actually get. A screen that blocks every gust also catches every gust — which is why the wind guidance earlier in this guide matters — while a slatted design takes the edge off the breeze without acting like a sail.
Keep This Checklist Handy — The First-Storm Screen Inspection
Do this walk-around after the first proper windy spell, before you settle into the seasonal routine. Each row stands alone — no other section needed.
| Check | What to look for | Fix it if it fails |
|---|---|---|
| Posts still plumb | Stand back and sight along each post. A 4×4 post (89 mm x 89 mm) should still read straight, with no lean at the top. | Re-plumb and re-pack the base; a leaning post will only lean further in the next storm. |
| Base has not shifted | Concrete-filled planters and buried posts should sit exactly where you left them, with no rocking when you push the screen firmly. | Top up ballast, re-set the planter, or re-anchor a bolted patio base before the next blow. |
| Slat gaps still even | Gaps should still measure 1–2 in (2.5–5 cm) and look uniform at eye level — the spacer-jig spacing from the build. | Re-fix any slat that has slipped and re-tighten its screws; uneven gaps are the first thing every visitor notices. |
| Screws and rails tight | Run a hand along top and bottom rails and check every screw line. Wind works joints loose quietly, starting at the rail ends. | Tighten loose screws now; replace any screw that spins without biting. |
| Post tops and slat ends sealed | Look for bare end grain, lifted finish, or water staining on post tops and slat ends after rain. | Re-seal bare end grain and consider a simple cap on post tops to shed rain. |
| Balcony check (if applicable) | On a balcony, confirm the weighted freestanding base has not crept and that lighter panels are still firmly seated — balconies amplify wind. | Re-centre the base, add ballast within the planter, and re-check any building or HOA fixing conditions. |
| Plants not prising boards apart | Climbers at the base should soften the screen, not push slats out of line or trap damp against fixings. | Trim climbers back from fixings and clear any trapped leaves from the base. |
If everything passes, your screen has earned its keep — file this check away with the seasonal routine and enjoy the patio.
Seasonal maintenance schedule
| When | Job | Why it matters |
|---|---|---|
| Early spring | Walk the whole screen, tighten loose screws, check posts and bases for movement, and wash off winter grime with a soft brush and mild soapy water. | Winter wind works joints loose quietly; small movement becomes wobble if you ignore it. |
| Summer | Check plant growth is not prising slats apart, trim climbers back from fixings, and confirm drainage in planter bases is not blocked. | Plants add weight and can trap moisture against the wood all season. |
| Autumn | Clear leaves from the base, look for soft or discoloured wood at ground level, and touch up any finish that has worn through. | The damp base is where rot almost always starts. |
| Every 3–5 years | Reapply exterior finish as the guide above describes, replacing any cracked or badly warped slats at the same time. | Finish is protection, not just colour — once it fails, weathering accelerates. |
Mistakes that shorten a screen’s life
- Building right up to a boundary without checking the rules. Height and placement limits vary, so confirm them before you dig or drill, not after a complaint.
- Leaving end grain unsealed. Post tops and slat ends drink water. Seal them, and consider a simple cap on post tops to shed rain.
- Uneven gaps you ‘will not notice’. You will notice, every day, at eye level. Use the spacer jig described in the build steps for every single gap.
- Treating a balcony screen like a garden screen. Balconies amplify wind and restrict fixing options, so the weighted, freestanding approach and lighter panels matter far more up there.
Common questions
Can I add a gate or opening in the screen later? Yes, if the frame was built in sections. Plan the opening between two posts, hang any gate from the stronger post, and keep the diagonal bracing on the gate itself so it does not sag. If your screen was built as one rigid panel, it is usually cleaner to rebuild that one section than to cut an opening into it.
How do I clean algae or green staining off the wood? Start gently: a soft brush, mild soapy water, and a rinse. Avoid blasting close with a pressure washer, which can scar softwood and force water into joints. Let the wood dry fully before deciding whether it needs refinishing — damp wood often looks far worse than it really is.
Keep This Chart Handy — Screen Acting Up? Diagnose It by the Symptom
Something looks wrong with your finished screen? Find the symptom, find the cause, fix it once — each row stands alone, no other section needed.
| Symptom | Likely cause | Fix it this way |
|---|---|---|
| Screen leans after the first windy spell | Base shifted, or a post was never truly plumb — a leaning post only leans further | Re-plumb and re-pack the base; top up ballast or re-anchor a bolted patio base |
| Slat gaps went uneven | A slat slipped, or wind worked the screws loose at the rail ends | Re-fix the slipped slat and re-tighten its screws; uneven gaps are the first thing visitors notice |
| Neighbours can see your silhouette at night | Patio lights on, neighbour’s side dark — light shining through the gaps outlines anyone behind the screen | Tighten gaps toward 1 in (2.5 cm) on that section, switch it to an angled or louvered arrangement, or add a planting layer in front |
| Screen catches every gust like a solid wall | Gaps too tight, or a solid-panel design — the screen is acting like a sail | Favour a slatted or louvered design with 1–2 in (2.5–5 cm) gaps that let the wind through |
| Post tops and slat ends going soft or stained | Bare end grain drinking water after rain | Re-seal the bare end grain and consider a simple cap on post tops to shed rain |
| Climbers pushing slats out of line | Plants prising boards apart and trapping damp against fixings | Trim climbers back from fixings and clear trapped leaves from the base |
| Balcony screen feels flimsy in the wind | Balconies amplify wind and restrict fixing options | Use the weighted freestanding base with lighter panels, and re-check building and HOA fixing conditions |
How tall should it be?
6 ft (the standard — blocks ground-level sightlines; the proportion that doesn’t feel like a wall). Taller: check codes/HOA (many limit fence/screen height — the regulation). The sightline walk determines if 6 ft suffices.
Will it survive storms?
Slatted/louvered: yes (the wind passes — the engineering). Solid: only if engineered (deep posts, strong base — the sail). The open designs are inherently storm-resistant; the solid designs need the structural respect.
What about the HOA?
Check first (the common restriction — height, materials, placement; the HOA surprise is the expensive one). Freestanding weighted screens sometimes bypass “structure” definitions (verify — the loophole varies).
Can I build it on a balcony (apartment)?
Weighted base (no drilling — the renter’s constraint), wind-rated (balconies are wind tunnels — the amplified load), and building/HOA approval (the gate). The planter-base design is the renter’s answer.
How do I maintain it?
Inspect annually (the maintenance — the base stability, the finish, the fasteners), refinish every 3–5 years (the wood protection), tighten as needed (the wind works joints loose over time).
Solid vs slatted — which is more private?
Solid: total visual block (but the wind sail + the fortress feel). Slatted (tight, 1″ gaps): 90% private (the gaps read as design; the sightline is effectively blocked at normal viewing distances). Louvered: the best of both (angled = private from outside, airy from inside). The louvered is the connoisseur’s choice.
Keep This Checklist Handy — The After-Dark and All-Season Screen Check
Run these checks on a finished screen. Each check stands alone — no other section needed.
| Check | What to do | Fix if it fails |
|---|---|---|
| After-dark check | After dark, sit in the normal seating spot with lights on as usual, then walk to each neighbouring viewpoint and look back. | If silhouettes read clearly, tighten slat gaps toward 1 in (2.5 cm) on that section, switch that section to an angled or louvered arrangement, or add a planting layer in front of it. |
| Wind-feel check | On a breezy day, sit behind a test panel and feel how much shelter it actually gives. | If it blocks every gust, favour a slatted design that takes the edge off the breeze without catching the full wind load. |
| Early-spring check | Walk the whole screen, tighten loose screws, check posts and bases for movement, and wash off winter grime with a soft brush and mild soapy water. | Do not ignore small movement — it becomes wobble if left alone. |
| Summer check | Check plant growth is not prising slats apart, trim climbers back from fixings, and confirm drainage in planter bases is not blocked. | Plants add weight and can trap moisture against wood all season. |
| Autumn check | Clear leaves from the base, look for soft or discoloured wood at ground level, and touch up any finish that has worn through. | The damp base is where rot almost always starts. |
| Every 3–5 years | Reapply exterior finish and replace any cracked or badly warped slats at the same time. | Finish is protection, not just colour — once it fails, weathering accelerates. |
The verdict: the privacy screen essentials
- Wind-engineered — slatted/louvered (the sail management).
- Sightline-tested — walk the neighbor’s view (the empirical).
- Sturdy base — planters + concrete or buried posts (the anti-tip).
- 4×4 posts — minimum (the wind demands it).
- Consistent gaps — spacer jig (the professional look).
- Finished wood — exterior rated (the longevity).
The privacy screen is the outdoor room’s fourth wall — the slats that block the gaze, the engineering that tames the wind, the finish that beautifies. Build it for the sightlines (walked, not assumed), engineer it for the wind (slatted, not solid), and anchor it like it matters (because the storm will test it). The morning coffee gets its privacy; the patio becomes a room.
Bookmark This Chart — Privacy Screen Specs at a Glance
Wind, sightlines, and structure — the specs in one place:
| Decision | The spec |
|---|---|
| Height | 6 ft standard — and the sensible max for freestanding |
| Posts | 4×4 minimum — the wind demands it |
| Slat gaps | 1–2″ — wind relief that still reads as design (tight 1″ gaps are ~90% private) |
| Best wind design | Louvered — blocks sightlines, passes wind; solid panels are sails |
| Freestanding base | Concrete-filled planters (concrete in the bottom third) or buried posts |
| The privacy test | Walk the neighbor’s sightline before building — angles beat height |
| Maintenance | Inspect yearly; refinish every 3–5 years |
Tool Worth Lab provides research-based project guidance. Engineer for wind load (screens are sails — slatted/louvered designs relieve pressure; solid screens need deep posts and strong bases), verify sightlines empirically (stand where the neighbors stand), anchor freestanding screens with adequate ballast (concrete-filled planters or buried posts), check HOA/code height limits before building, and use 4×4+ posts (wind forces demand substantial structure).
Keep Reading
Loved this guide? These related articles will keep your project moving: