
Quick Answer: A DIY evaporative cooler — fan, water and pads — can drop air temperature 15–30°F for pennies of electricity, but only in dry climates under about 40% humidity. In humid climates over 60% it will disappoint, no matter how well you build it.
Picture a 100°F afternoon, your room feels like the inside of a parked car, and the fix sitting in your garage costs less than a takeaway dinner: a five-gallon bucket, a cheap fan, and some soggy pads. No compressor screaming, no scary power bill — just water doing what water has always done, stealing heat from the air as it evaporates.
There is one catch, and it is a deal-breaker: this trick only works where the air is dry. Get that part wrong and your clever cooler becomes a very expensive way to make your room feel like a swamp. So before a single hole gets cut, we will run the two-minute climate check that decides whether this build is genius or a waste of a Saturday — then build the thing properly.
The honest premise: evaporative cooling works in dry climates (the <40% humidity — the Phoenix, the Denver) and disappoints in humid (the >60% — the Houston, the Miami). Check your climate first — the physics doesn’t negotiate.
How it works (the physics)
- Hot dry air (the intake — the summer).
- Water-soaked pads (the media — the air passes through).
- Evaporation (the water absorbs the heat — the air cools 15–30°F).
- Cool moist air (the output — the relief).
The wet-bulb (the limit — the air can’t cool below the wet-bulb temperature; the drier the air, the bigger the drop; the chart below).
The humidity reality
| Humidity | Cooling | Verdict |
|---|---|---|
| <30% | 25–30°F drop | The excellent (the desert) |
| 30–50% | 15–20°F drop | The good (the workable) |
| 50–70% | 5–10°F drop | The marginal (the disappointment) |
| >70% | ~0°F | Don’t build (the physics) |
Check the summer humidity (the weather data — the build/don’t is the climate).
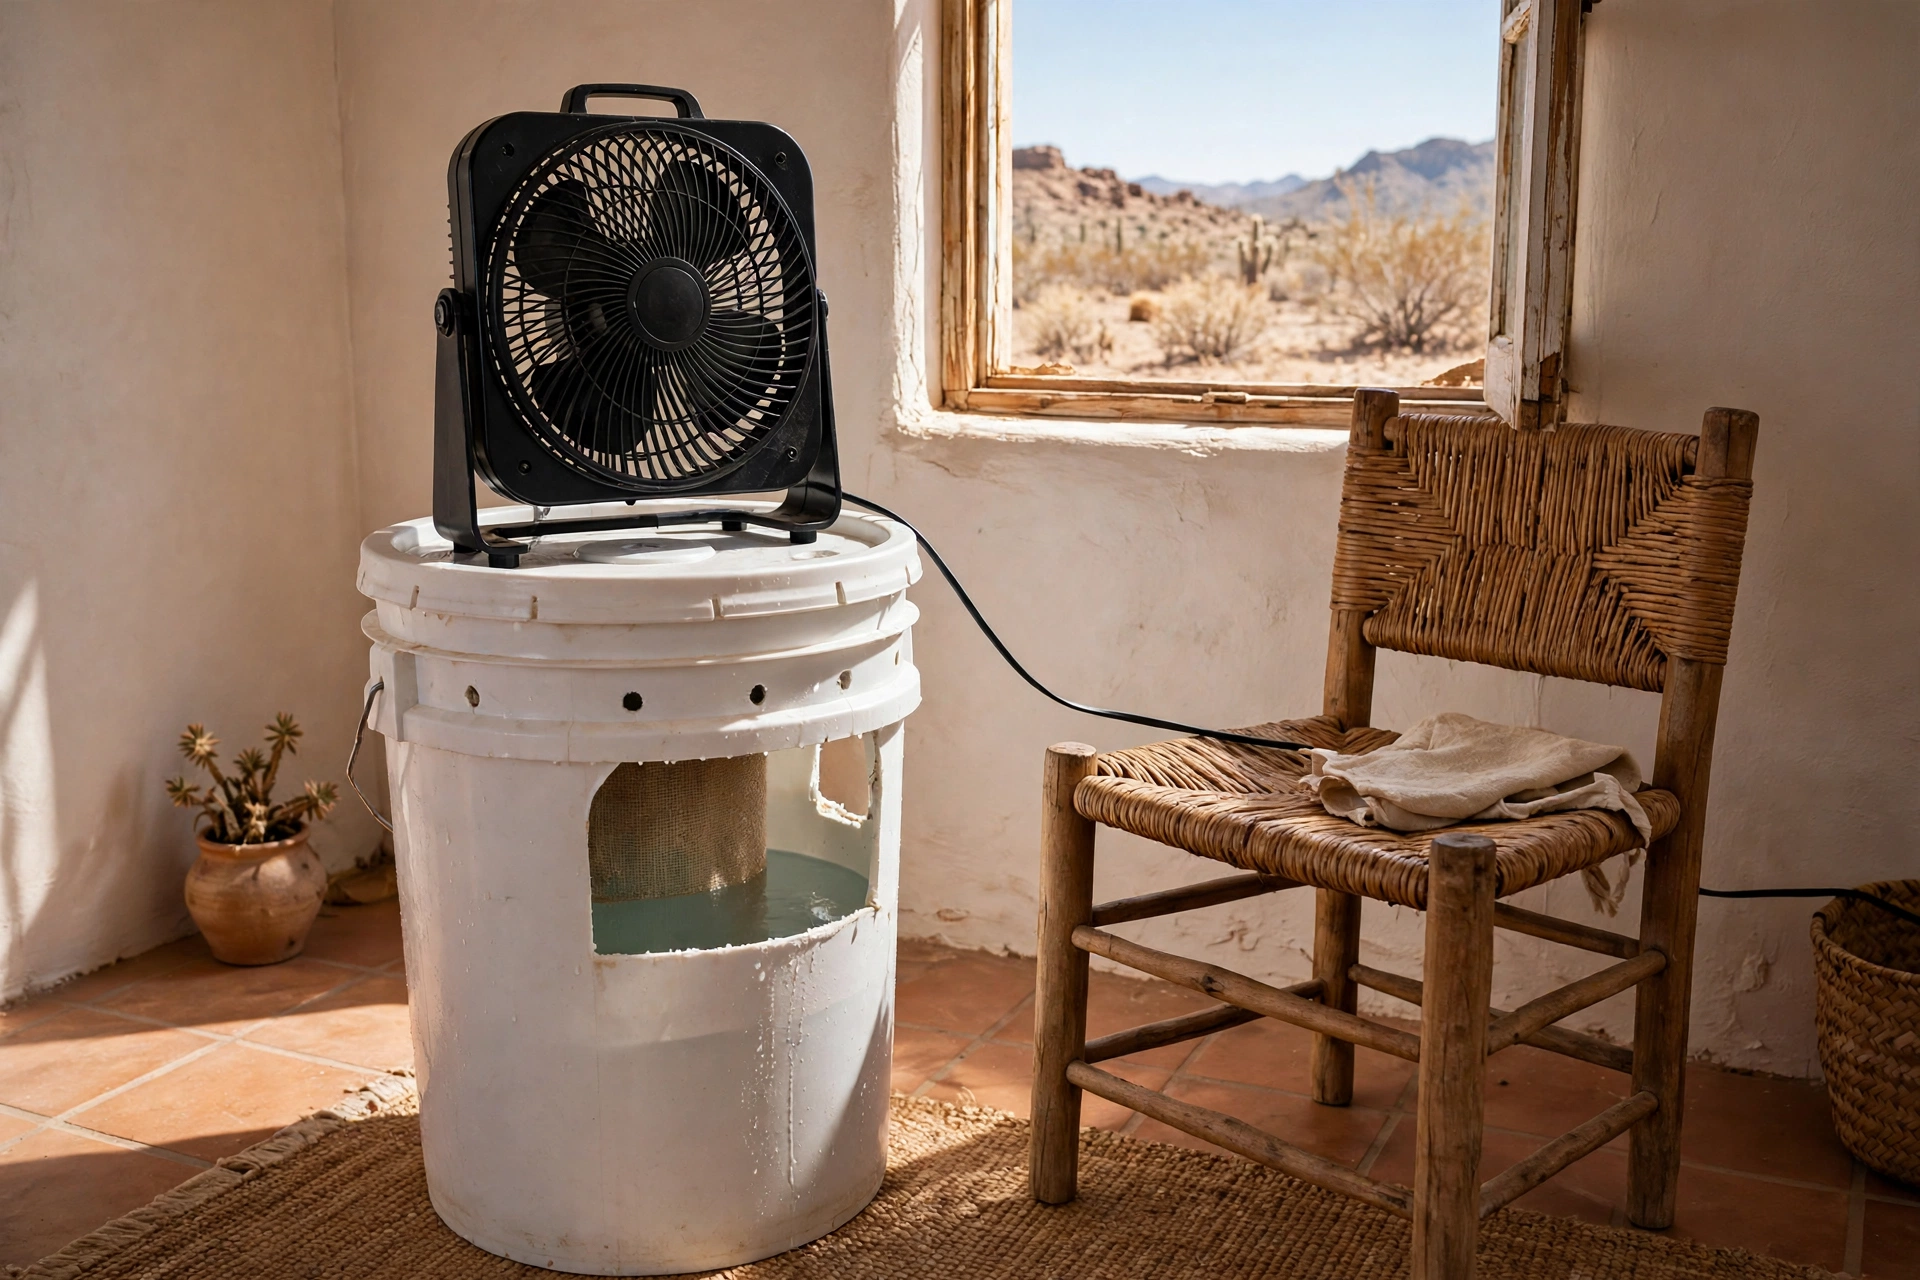
The build (the 5-gallon bucket)
Materials
- 5-gallon bucket (the housing — the insulated better).
- Fan (the 12V — the computer fan or the bilge; the airflow is the cooling).
- Evaporative pads (the media — the aspen or the cellulose; the water-wicking).
- Water (the reservoir — the bucket’s bottom; the pump for the recirculating).
- 12V power (the battery or the adapter — the portable).
Construction
- Holes (the intake — the sides; the jigsaw).
- Pads (the lined — the water-wicking; the secured).
- Fan (the lid — the exhaust; the sealed).
- Water (the bottom — the pads wick; the pump for the active).
- Power (the 12V — the switch).
The wicking (the passive — the pads draw the water; the simple). The pump (the active — the recirculating; the consistent).
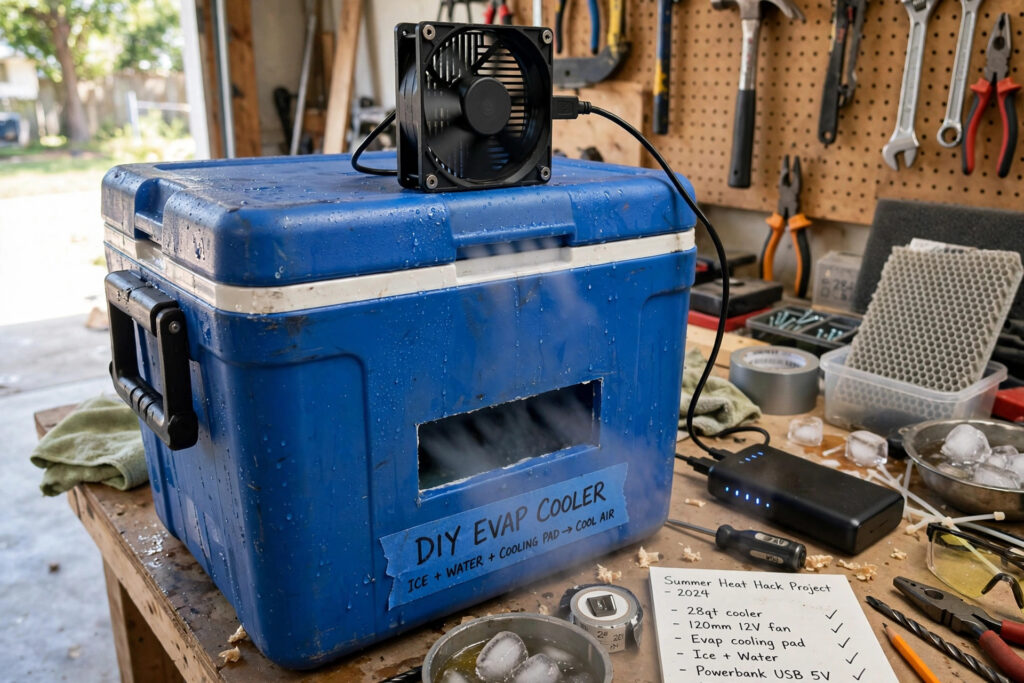
The bigger (the box cooler)
- Cooler body (the insulated — the ice chest; the larger).
- Bigger fan (the airflow — the CFM is the cooling).
- More pads (the surface area — the evaporation).
- The pump (the recirculating — the necessary at scale).
The ice (the boost — the frozen bottles in the reservoir; the extra 5–10°F; the thermal).
Ventilation (the critical)
Evaporative coolers need the exhaust — the moist air must leave (the crack the window; the cross-ventilation).
- The window (the opposite — the open 6″; the air path).
- The humidity (the indoor — the monitor; the 60%+ is the too-much).
The sealed room (the mistake — the humidity builds; the cooling stops; the mold). Ventilate always.
Tools needed
| Tool | For |
|---|---|
| Jigsaw/drill | Holes (the cutting) |
| Tape measure | Layout |
| Caulk gun | Sealing (the air path) |
Which build for which space? A realistic scenario breakdown
Evaporative coolers reward people who match the build to the space, and punish anyone who expects one little bucket to behave like central air. Before you cut a single hole, walk through the space you actually want to cool. Where will you sit, sleep, or work? How far is that spot from where the cooler can sit? Is there a window on the far side you can crack open for the moist air to leave? Those three answers decide the build far more honestly than any parts list.
| Your space | Build that fits | What to honestly expect | Watch out for |
|---|---|---|---|
| Desk or work-from-home corner | Bucket build, close by | A personal stream of cooler air while you work — this is the bucket build at its best | Sitting across the room from it and wondering why nothing changed |
| Small bedroom at night | Box cooler build | Cooler sleeping air in a dry climate, with the window cracked | Running it sealed all night — humidity climbs and the cooling fades |
| Garage or workshop | Box build, aimed at your bench | Relief where you stand and work, not a chilled whole building | Dust on the pads — rinse them more often than an indoor build needs |
| Tent or off-grid camping | Bucket build on battery power | Genuinely pleasant air in dry country, sipping power | Humid nights — when the air is already damp, expect very little |
| Rental room you cannot modify | Bucket build, no permanent changes | Portable, landlord-friendly cooling you can pack away | Water spills on floors you do not own — sit it in a shallow tray |
Notice the pattern: the closer the cooler sits to you, and the clearer the exit path for the moist air, the better any build performs. Distance and sealed rooms defeat more DIY coolers than weak fans ever will.
Running it well: a simple daily and weekly routine
Most disappointing coolers are not badly built — they are badly run. This short routine is the difference between “it worked on day one” and “it works all summer”:
- Start with fresh, cold water. Yesterday’s warm, dusty reservoir water cools poorly and starts to smell. Empty what is left, rinse the bucket or cooler, and refill before a hot day, not during it.
- Soak the pads before you need the air. Give the pads a few minutes fully wet before switching the fan to full. Dry pads at startup just blow warm air at you and waste your patience.
- Position for a short, straight air path. Put the cooler near where you sit, angled at you, with nothing blocking the intake holes. Every extra metre between the cooler and your chair costs you the effect.
- Open the exit window first, not later. Crack the far window as part of switching on, not as an afterthought when the room already feels muggy. Ventilation is half the system, not an accessory.
- Check how the room feels after an hour. If the air feels heavy rather than fresh, the room is saturating — open the window wider or move the cooler nearer instead of adding more water.
- Once a week, rinse and inspect the pads. Mineral crust and dust choke the wicking. A rinse, the occasional vinegar soak mentioned earlier, and a squeeze-out keeps them drinking properly. Let pads dry out fully now and then — constant damp is what invites the musty smell.
- End the season clean. Drain it, wash the reservoir, let everything dry before storage, and plan on fresh pads next season. A cooler stored wet in autumn greets you with a swamp in spring.
Mistakes that make a good build feel useless
- Judging it in the first five minutes. Pads need to be fully wet and the room’s air needs a few full changes before you feel the real drop. Give it a fair half hour with the window open.
- Filling it with warm water and blaming the fan. The water temperature matters at startup. Cold water — and frozen bottles on the worst days — starts you ahead instead of behind.
- Pointing it at a wall or into a corner. The cool stream needs to reach a person, not a plasterboard. Aim it like you would aim a fan, because that’s the delivery half of the machine.
- Ignoring the smell until it wins. A faint swampy smell is an early warning, not a personality trait. It means stagnant water or tired pads — clean now, while it is a ten-minute job.
- Expecting it to rescue a humid heatwave. When a storm system parks damp air over a normally dry town for a few days, even a perfect build goes quiet. That is the physics from the start of this guide, not a failure of your build.
Keep This Chart Handy — Cooler Not Cooling? Diagnose It in Minutes
Stop and check before you blame the fan or rebuild anything. Match what you feel to the most likely cause, then try the fix in order. Each row stands alone — no other section needed.
| Symptom | Most likely cause | Fix to try first |
|---|---|---|
| Feels great at first, then fades after about an hour | Room humidity climbing because the exit window is barely open; the cooler keeps adding moisture while the cooling effect shrinks. | Open the far window wider — about 6 in (15 cm) on the opposite side of the room — and keep indoor humidity under 60% while the cooler runs. |
| Warm air at switch-on, even though the fan runs | Pads still dry at startup, or the reservoir was filled with warm water. | Soak the pads fully for a few minutes before switching the fan to full, and start with fresh, cold water. On the worst days, add frozen bottles to the reservoir for an extra 5–10°F (3–6°C) boost — never dry ice. |
| Cool air never reaches you | Cooler sitting across the room, or pointed at a wall or into a corner, with intake holes blocked. | Move the cooler near your seat, angle it toward you, and clear anything blocking the intake holes. The bucket build is personal space; the box build does a small room. |
| Musty or swampy smell | Stagnant reservoir water or pads that never dry out; mineral crust and dust choking the wicking. | Empty and rinse the reservoir, wash or soak the pads (an occasional vinegar soak helps), and let everything air-dry. If the smell survives a proper clean, the pads have had their season — replace them. |
| Almost no cooling even on a hot day | Humidity too high for evaporation: over 60% disappoints, and over 70% gives almost nothing (about 0°F of drop). | Check the day’s humidity honestly. In a humid spell, even a perfect build goes quiet — that is the physics, not a build failure. Use the fan alone until dry air returns. |
| Cooling fades late in the day | Reservoir running low, so pads dry out; or a full day’s water budget spent. Plan on roughly one 5-gallon (19-litre) reservoir per day of runtime. | Top up with fresh, cold water and re-soak the pads before judging the cooler again. |
Rule of thumb: give any fix a fair half hour with the window open before you declare it a failure — pads need to be fully wet and the room’s air needs a few full changes first.
Common questions
Why does it feel great at first, then less impressive an hour later? Usually because the room’s humidity has been quietly climbing — especially if the exit window is barely open. The cooler keeps adding moisture while the cooling effect shrinks. Open the window wider, and the “second hour slump” mostly disappears. If it doesn’t, check whether the pads have dried out because the reservoir ran low.
Why does my cooler smell musty, and how do I stop it? Stagnant water and pads that never dry are the usual culprits. Empty and rinse the reservoir, wash or soak the pads, and let everything air-dry before the next run. Prevention is simple: fresh water, a weekly rinse, and never storing the cooler wet. If the smell survives a proper clean, the pads have had their season — replace them.
Keep This Chart Handy — The Ice Boost, Done Right (and the One Thing Never to Try)
Ice is the cheapest performance upgrade this build has — and the easiest to get wrong. Every row below stands alone; no other section needed.
| Ice move | What it does | Watch out for |
|---|---|---|
| Frozen bottles in the reservoir | Adds an extra 5–10°F (3–6°C) of cooling on the worst days. | The melt is the limit — once the bottles thaw, the boost fades; swap in fresh frozen ones. |
| Start with fresh, cold water | Cold water starts you ahead instead of behind; warm reservoir water cools poorly at switch-on. | Yesterday’s warm, dusty leftover water also starts to smell — empty and refill before a hot day. |
| Soak the pads first | Give the pads a few minutes fully wet before switching the fan to full. | Dry pads at startup just blow warm air at you, ice or no ice. |
| Never use dry ice | Nothing — dry ice is not a stronger version of frozen bottles. | It releases CO2 in an enclosed space and is a genuine danger. Frozen bottles only, always. |
| Ice is a boost, not a rescue | On a dry day it sharpens a good build; it cannot fix a humid one. | Over 60% humidity the build disappoints no matter what you freeze — that is the physics, not a build failure. |
| Judge it after half an hour | Pads need to be fully wet and the room’s air needs a few full changes before you feel the real drop. | Do not declare the ice a failure in the first five minutes — give any fix a fair half hour with the window open. |
Will it cool my whole house?
The bucket: no (the personal — the desk; the tent). The box: the room (the small). The house: the commercial (the roof swamp cooler — the different).
How much water does it use?
The gallons/day (the evaporation — the 5-gallon lasts the day; the humidity dependent).
Can I use it in humidity?
The honest: no (the >60% — the physics; the fan alone is the better). The dehumidifier: the opposite (the irony).
What about the ice?
The boost (the frozen bottles — the 5–10°F extra; the melt is the limit). The dry ice: NO (the CO2 — the danger).
How long do pads last?
The season (the mineral buildup; the replacement yearly; the vinegar soak extends).
Is it cheaper than AC?
The pennies (the fan’s watts vs the compressor’s kilowatts — the 10x cheaper; the dry climate’s answer).
Print This Before You Run It — The Daily and Weekly Cooler Routine
Follow this routine every time the cooler runs. Each row stands alone — no other section needed.
| When | Do this |
|---|---|
| Before a hot day | Empty leftover water, rinse the bucket or cooler body, and refill with fresh, cold water. Yesterday’s warm, dusty reservoir water cools poorly and starts to smell. |
| At switch-on | Give the pads a few minutes fully wet before switching the fan to full, and crack a window about 6 in (15 cm) on the opposite side of the room first, not later. |
| Positioning | Place the cooler near the seating spot, angled toward it, with nothing blocking the intake holes. Every extra metre between cooler and chair costs cooling effect. |
| After 1 hour | If the air feels heavy rather than fresh, the room is saturating: open the window wider or move the cooler nearer instead of adding more water. Keep indoor humidity under 60% while the cooler runs. |
| Once a week | Rinse and inspect the pads, squeeze them out, and give an occasional vinegar soak. Mineral crust and dust choke wicking. Let pads dry out fully now and then — constant damp invites a musty smell. |
| Water budget | Plan on roughly one 5-gallon (19-litre) reservoir per day of runtime. |
| End of season | Drain the unit, wash the reservoir, let everything dry before storage, and plan on fresh pads next season. A cooler stored wet greets the next summer with a swamp. |
The verdict: the evaporative essentials
- Dry climate — <50% humidity (the prerequisite).
- The pads — the wicking (the media is the cooling).
- The airflow — the fan (the CFM is the delivery).
- The ventilation — the exhaust (the moist air must leave).
- The ice boost — the frozen bottles (the extra).
- The expectations — 15–30°F (the honest).
The DIY evaporative cooler is the physics — the water + air + pads, the 20°F drop, the pennies. Build it for the dry, ventilate the moist, ice the reservoir. The desert’s air conditioner, the tinkerer’s cool, the summer’s relief.
Bookmark This Checklist — The Swamp Cooler Rules
Seven rules that decide whether this build sings or sweats:
- Check your climate first: under 50% summer humidity, build it; over 60%, don’t. Expect a 25–30°F drop under 30% humidity, 15–20°F at 30–50%, and almost nothing over 70%
- Ventilate always: crack a window ~6″ on the opposite side of the room — a sealed room stops cooling and grows mold
- Watch indoor humidity: keep it under 60% while the cooler runs
- Ice boost: frozen bottles in the reservoir add 5–10°F — never dry ice (the CO₂ danger)
- Budget the water: roughly one 5-gallon reservoir per day of runtime
- Pads are annual: replace them each season; a vinegar soak stretches their life
- Size it honestly: the bucket build is personal space, the box build does a small room — whole-house cooling is a different, commercial machine
Tool Worth Lab provides research-based cooling guidance. Verify your climate’s summer humidity before building (above 60% humidity — evaporative cooling is ineffective; the physics doesn’t negotiate), always ventilate the cooled space (sealed rooms build humidity until cooling stops and mold risks rise), never use dry ice (CO2 danger in enclosed spaces), ensure electrical components stay dry (water + electricity — GFCI protection), and maintain pads against mineral buildup (yearly replacement — the performance).
Keep Reading
Loved this guide? These related articles will keep your project moving: